首页
做手工
有童画
学美术
讲故事
▼全部
小制作
七巧板
做家居
有饰品
爱发明
玩粘土
来折纸
去剪纸
小卡片
DIY儿童益智类小玩具 空气浆动力赛车制作教程
做手工
/ 作者:yiyiyaya
/ 时间:2019-03-20
今天教大家来制作一个非常有趣的赛车,用电池的电力带动螺旋桨,它就可以跑起来啦!快来学一下吧!
准备材料如图所示。
用螺丝将三根木方如图固定在一起。
在一根木方的头部安装一个光杆。
安装塑料滑轮。
在后面的木方两侧安装两个钢钉,在上面安装塑料滑轮。
如图所示,滑轮安装完成。
安装半圆形塑料盒。
在塑料盒上面安装马达,用双面胶将电池盒粘贴在木方上面。
在马达上面安装塑料螺旋桨。
连接电线。
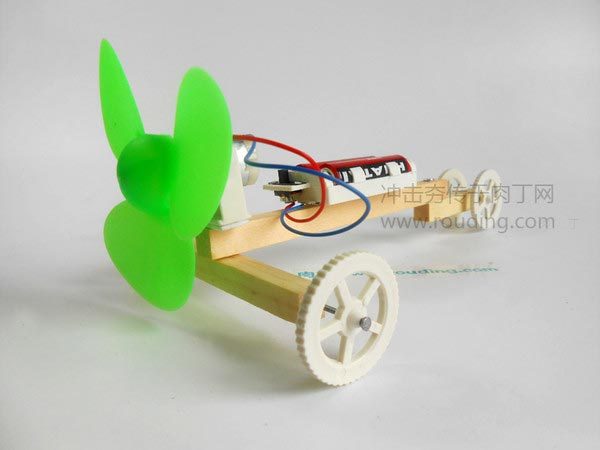
成品效果展示图。
有趣的空气浆动力赛车制作完成啦!是不是很简单呢?小朋友你学会了吗?
上一篇:
DIY杠杆原理投篮器小制作 灌篮高手投篮器小玩具
下一篇:
DIY儿童趣味科技小制作小发明 小牛顿奇趣吹球机拼装模型
相关专辑:
8一9岁
/
橡皮泥
/
创意手工
/
环保手工
/
相关阅读
鸡蛋壳手工DIY创意个性人偶图片
科技小发明 会发光的羽毛球
科技小发明:会伸缩的汤勺和卫生碗等餐具创
多功能粉笔套和方便自动铅笔的创意科技小发
手工创意之核桃壳制作的创意小物系列欣赏
超级捕鼠器的创意设大全计 儿童创意手工制
雪糕棍手工DIY的创意小相框手工制作图片
小学生手工制作台灯 用各种废弃塑料包装瓶
藤条剪纸手工制作的漂亮节日布置蝴蝶花环创
纸杯做手工的小创意 一次性纸杯手工制作小
儿童实用创意小发明 防作弊视力表的做法
有趣的火警报警器创意小发明原理及线路图
排行
手工diy废物利用:卷纸芯制作神奇万花
手工科技小制作—装在瓶子里的春天
万花筒是什么原理 古典光学玩具万花筒简
万花筒的手工制作方法详细手绘图解教程
儿童科技手工小制作 偏振万花筒的做法详
儿童手工制作教程 简单皮筋弩的做法图解
DIY儿童小制作验钞器模型 验钞器小发
DIY发条车橡皮筋弹力车 力学原理儿童
自制直流电动机小实验 电磁感应小制作小
DIY儿童科学小发明大全 风力发电机演
最热
幼儿园手工 废纸盒制作鸟窝挂饰
废纸袋制作万圣节绿人怪
圣诞节儿童DIY树枝圣诞树
废纸盒瓶盖制作玩具时钟
瓶子小创意 有趣的细胳膊小人
儿童手工制作纸盘穿线圣诞树
废玻璃瓶制作可爱表情笔筒
卷纸筒制作闪亮亮的圣诞挂件
CopyRight © 2010-2023
©youshiban.cn咿咿呀呀
辽ICP备19016139号-6

 今天教大家来制作一个非常有趣的赛车,用电池的电力带动螺旋桨,它就可以跑起来啦!快来学一下吧!
 准备材料如图所示。
 用螺丝将三根木方如图固定在一起。
 在一根木方的头部安装一个光杆。
 安装塑料滑轮。
 在后面的木方两侧安装两个钢钉,在上面安装塑料滑轮。
 如图所示,滑轮安装完成。
 安装半圆形塑料盒。
 在塑料盒上面安装马达,用双面胶将电池盒粘贴在木方上面。
 在马达上面安装塑料螺旋桨。
 连接电线。
连接电线。 成品效果展示图。
 有趣的空气浆动力赛车制作完成啦!是不是很简单呢?小朋友你学会了吗?


